Lately I’ve been working with OpenShift and its source-to-image capabilities and I must say I am impressed. How impressed you ask? Impressed enough to want to write my own “Hello World” app for it. Currently, there is a simple Python app available which is used for most demos/education material. Even though the app does the job, I think that it doesn’t fully demonstrate some of the more powerful capabilities of OpenShift and OpenShift S2I. And then of course there is the result. Let’s face it, no one gets excited by seeing a “Hello World” message on a white canvas.

I spent some time thinking how to enrich the experience and came up with five criteria for the app.
Here goes:
- The app has to be simple and not by means of importing 100 packages.
- It needs dynamic content – “Hello World” is boring.
- It should connect to other APIs – that’s what you’d do in real life, isn’t it?
- It should be configured – how about injecting secrets? If this fails, you’ll know – no smoke and no mirrors.
- It’s not production, it’s a demo – best practices for secret handling, security and high availability are not part of this project.
With these specs in mind, and given my past experience with Twitter from building Chirpsum, a Twitter news aggregator, I chose it as the source of dynamic content. Consuming the Twitter API requires configuring secrets so two more ticks. To cover the remaining two criteria, I chose Python and Flask.
I basically built a search app for Twitter which returns you the top 10 tweets related to a word or a phrase and also the top 4 words/mentions that are used along with your search query.
Want to try it out yourself? What follows is a step-by-step walk-through of deploying the app. If you’re here just to see results, skip that section – although the deployment of the app is the real magic.
Deploying the app
This post assumes you have an understanding of container technologies and know what Kubernetes, OpenShift and Docker are. If you don’t, that’s fine, you don’t really need to. It’s just that you won’t be able to fully appreciate the effort and time saved in DevOps. In any case, try to think of your current path to a cloud deployment and compare it to the following.
What is OpenShift’s Source-to-Image (S2I)?
Simply put, it is a tool that automatically builds a Docker image from your source code. Now the real beauty of it is that for specific languages (Python being one of them) OpenShift will pick a builder image and build the Docker image for you without you having to define a Dockerfile. You just need to provide some configuration details in the expected format.
Prerequisites
- Basic knowledge of OpenShift and Kubernetes (here’s a start)
- A preconfigured OpenShift environment (you can use one of the trials if you don’t have one)
- A Twitter account with a registered phone number
- 10 minutes
Steps
Create a Twitter app and obtain the secrets for it
- Login to apps.twitter.com and create a new app
- Once
created, switch to the Keys and Access Tokens tab and take note of the
following:
◦ Consumer Key (API Key)
◦ Consumer Secret (API Secret)
◦ Access Token
◦ Access Token Secret - Switch to Permissions and change to Read only
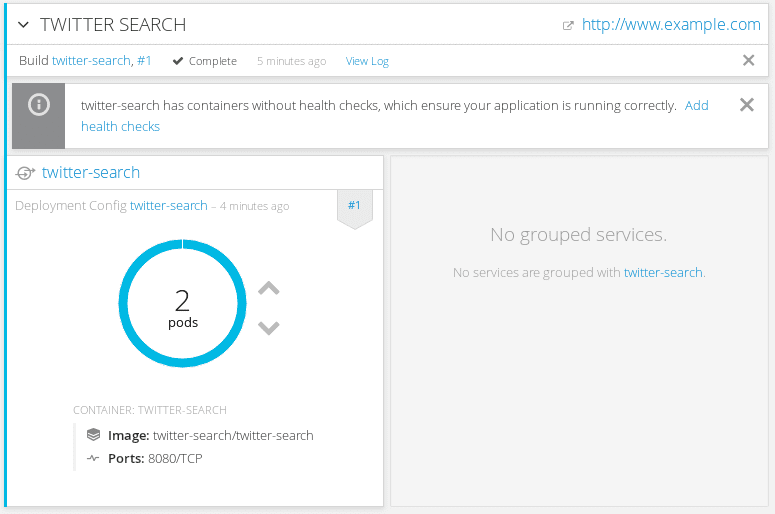
Deploy the app in OpenShift
- Login to the OpenShift webconsole
- Create a New Project:
◦ Name: twitter-search
◦ Display Name: Twitter Search - Select Python under languages (this might differ depending on the configuration of your OpenShift environment)
- Select Python 2.7
- Click on Show advanced routing, build, deployment and source options and fill out the form
◦ Name: twitter-search
◦ Git Repository URL: https://gitlab.com/ammeon-public/twitter-search-s2i.git
◦ Routing: tick the Create a route to the application box
◦ Deployment Configuration: add the following environment variables (you need your Twitter secrets now – if in production you should use a more secure way of injecting secrets)
• OAUTH_TOKEN=Access Token
• OAUTH_TOKEN_SECRET=Access Token Secret
• CONSUMER_KEY=Consumer Key (API Key)
• CONSUMER_SECRET=Consumer Secret (API Secret)
These environment variables will be exported in the container that the Python app will run. The Python app then reads these variables and uses them to authenticate with the Twitter API.
Warning! Your browser might save these values. Make sure to either delete the app at the end, use an incognito window or clear the Auto-fill form data from your browser. - Scaling: Set the number of Replicas to 2 (this is to avoid downtime during code updates and also increase the availability of the app – these concepts are not covered in this demo)
- Click Create.
Click Continue to overview and wait (~2mins) for the app to build and deploy.
Note: the first build will be considerably slower than subsequent ones as OpenShift has to build the image and get the required Python packages. On subsequent builds, the base image is reused changing only the source code (unless significant configuration/requirement changes are made).
(Here: http://www.example.com)
Hello World, Twitter Style
That’s it, you’re ready to greet the world! Just enter a word and click on the Search button.

Clean up
After you finish demonstrating the app, it’s a good idea to clean up. To do so, follow these steps:
- From
the OpenShift webconsole
◦ Click on the project drop-down on the top-left
◦ Select view all projects
◦ Click the bin icon on the right of the project’s name (“Delete Project”) - Go
to apps.twitter.com and select your app
◦ Scroll to the bottom and select “Delete Application”
To Wrap it up
OpenShift’s source-to-image capability makes cloud deployment and DevOps extremely easy. For production environments of big enterprises with complex software that needs to be optimized at a Docker or OS level, S2I might not be optimal. But for building and deploying simple apps it saves you the hassle of defining a Dockerfile and the necessary deployment scripts and files (think yaml).
It just streamlines the experience and allows the developer to focus on building the best app they can.
Thanks for reading! I hope you’ll enjoy playing around with the app and perhaps use it as your default demo app. Please do open pull requests if you want to contribute and of course, follow me on Twitter @YGeorgiou.
The post SOURCE CODE TO CLOUD DEPLOYMENT IN LESS THAN 10MINS appeared first on Ammeon.